Senin, 11 Agustus 2014

Super moon over Manhattan

Last night I photographed the super moonrise over lower Manhattan with the new World Trade Center. I primarily used the new Nikon D810, but also used the Fuji X-T1 with 18-135mm zoom for some tests I was doing with it.

A super moon is not only larger than a typical full moon because of its proximity to the earth, it is also brighter. This makes it more difficult to integrate into a night cityscape where you want to hold detail in both the city and the moon. To get around this I bracketed the shots heavily with several stop differences between the city photo and the moon photo. Later I merged the two in Photoshop so the moon would have its full detail.


Lower Manhattan with World Trade Center and super moonrise taken with the Nikon D810 and 70-200mm f/4 Nikon zoom.  With the ISO set for 64 the exposure of the city was 1/2.5 second, while the exposure for the moon was 1/25th second.

For this view I wanted a time-lapse to blur the water. Taken with the Fuji X-T1 and 18-135mm lens at an ISO of 200, the exposure was 30 seconds for the city at f/22, but 1/15th second for the moon at the same aperture. 


Rabu, 06 Agustus 2014

Nikon D810 - a hands-on review

The first thing you notice about the new D810 is its sound, or, more exactly, the lack of sound. It is quiet with a muffled dampening to the normal shutter and mirror noise, your first indication that something different is going on inside this camera. The new sound is a result of a redesign of the mirror sequencer / balancer unit to minimize shutter vibration -- a big improvement over the D800/800E models, whose high resolution sensors were offset by the increased sensitivity to motion blurring.. 

The 36.3-megapixel sensor has improved microlenses for gathering light. When coupled with the new EXPEED 4 image processor the performance is said to be increased by 30% with a new native base ISO of 64 and a range extending one more stop to 12,800 (32-25,600 extended). These improvements also result in clearing the buffer faster, which translates into overall speed improvement.


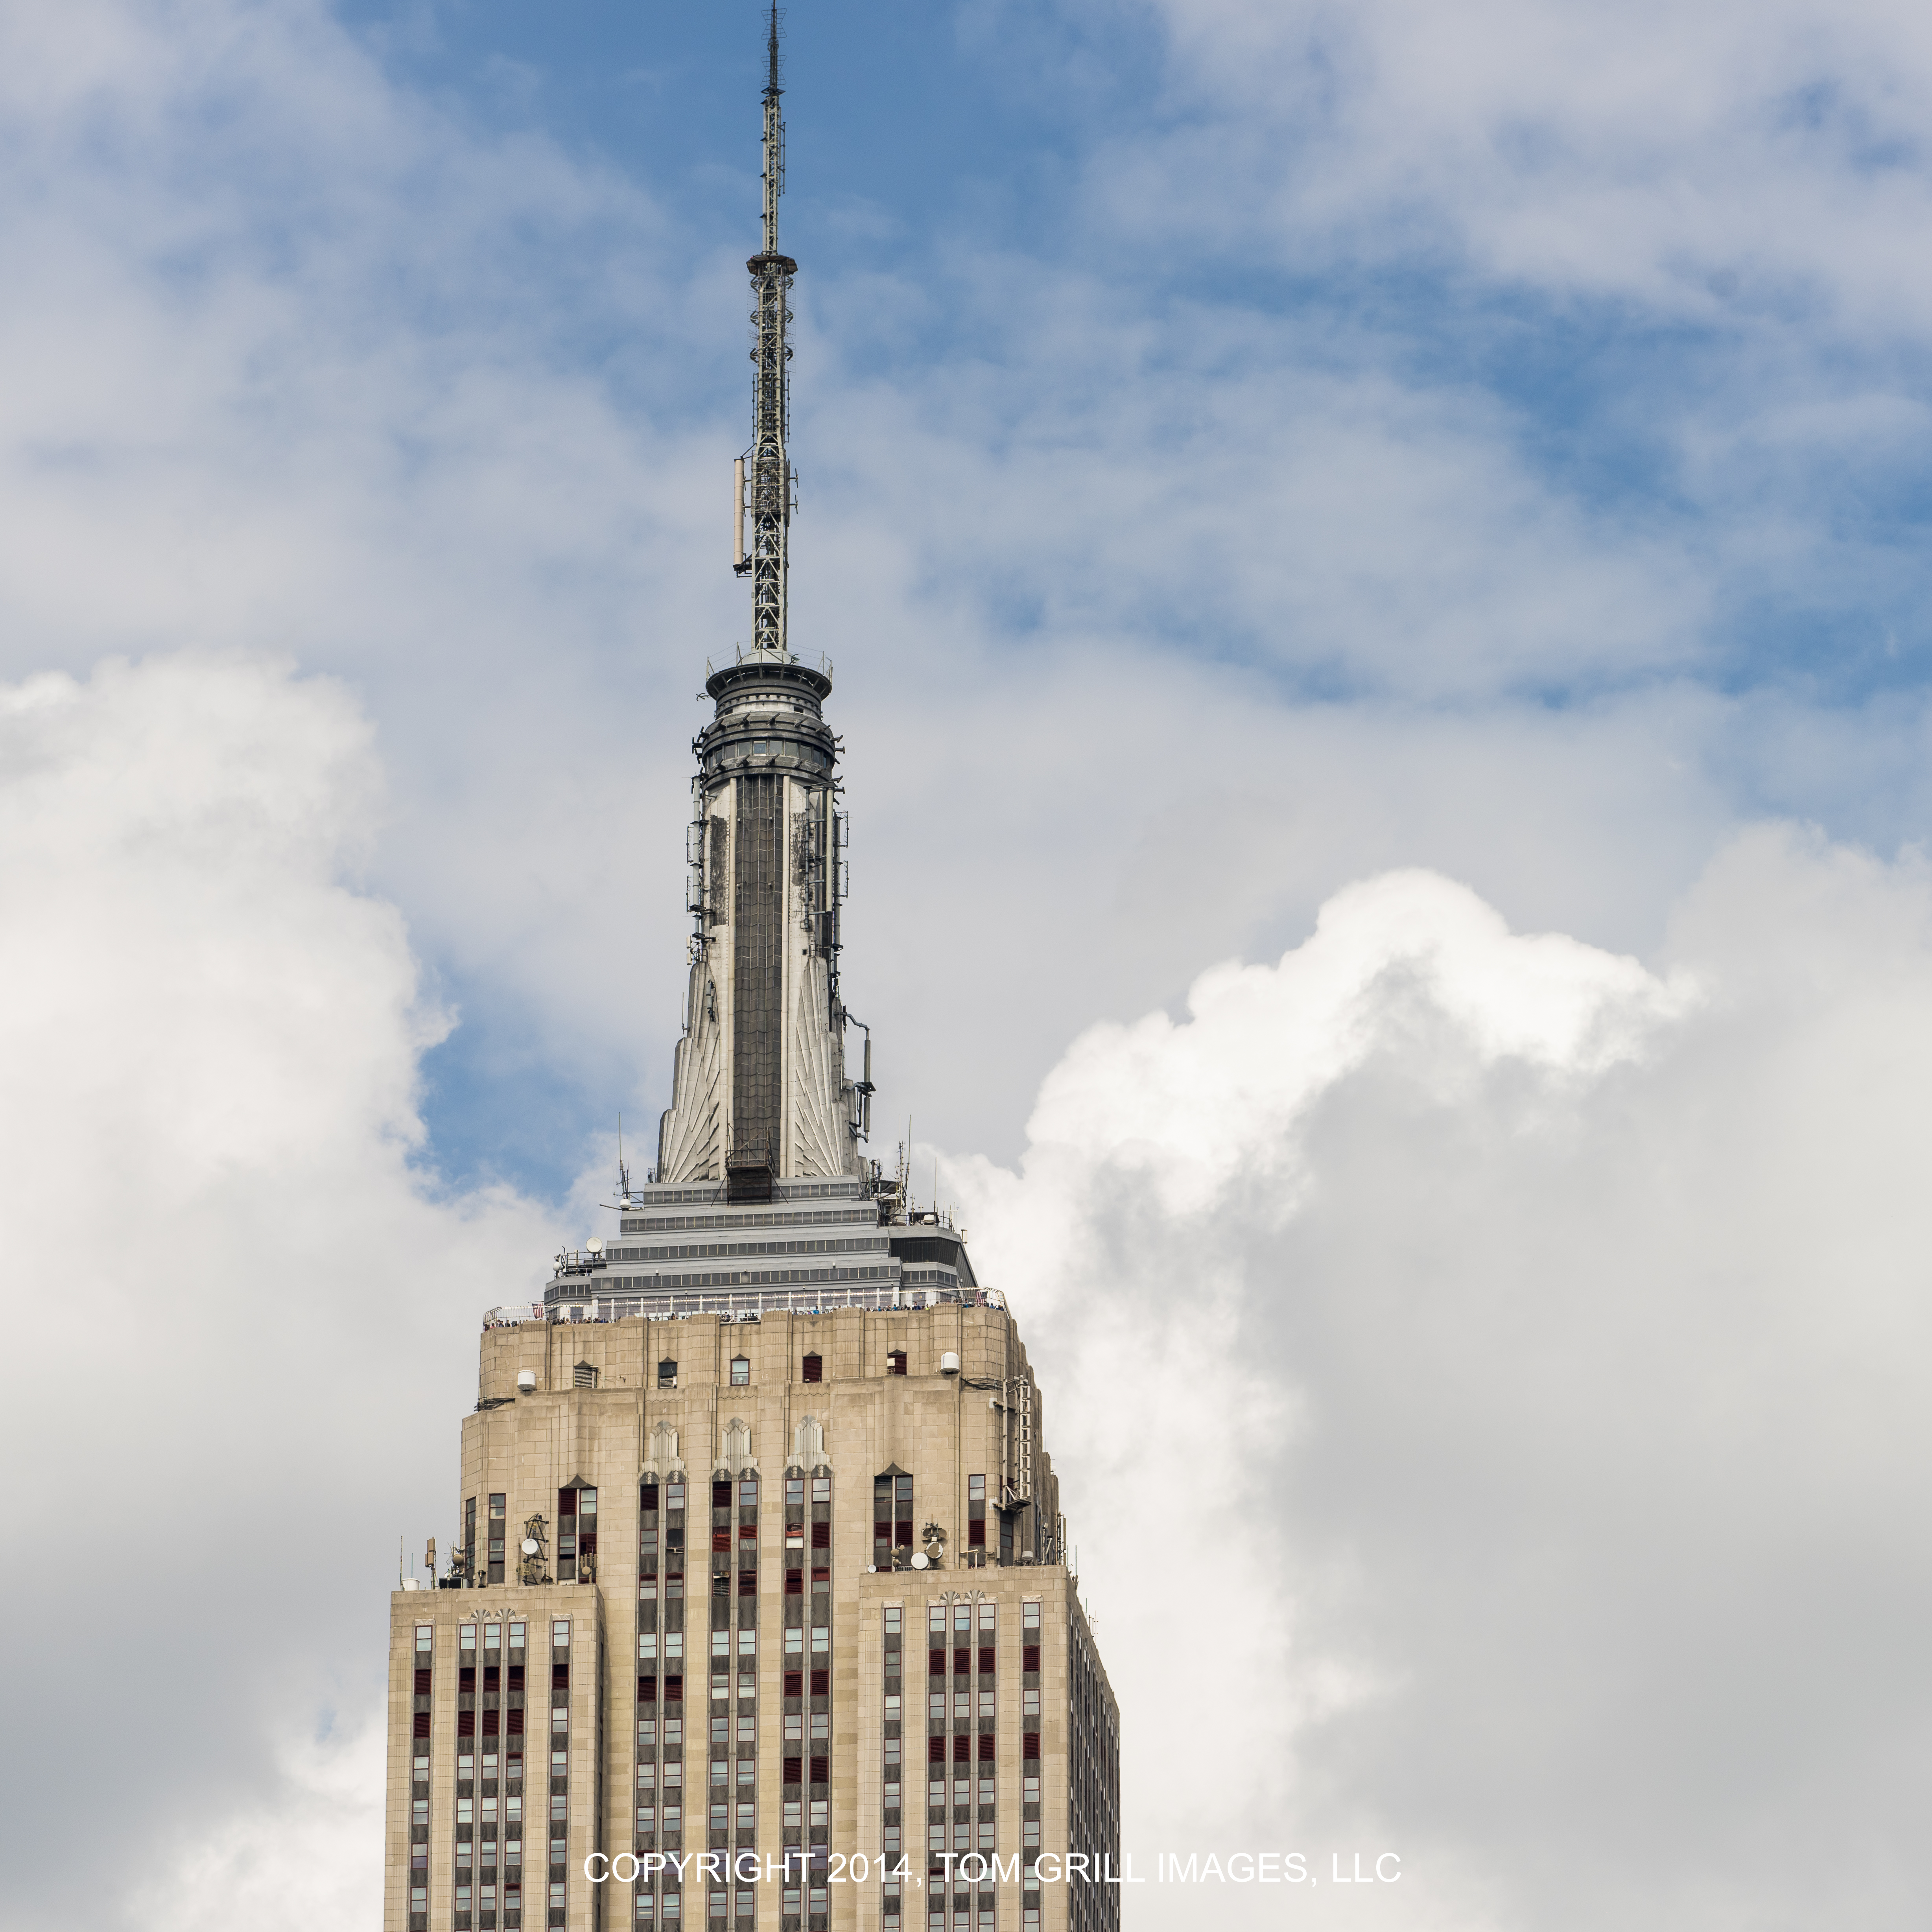
The sensor on the D810 no longer has an optical low-pass (anti-aliasing) filter instead of just cancelling it out as was the case on the D800. This should theoretically improve the resolution of the camera, and indeed the D810 recently nudged itself to the top slot on the DxOmark sensor ratings. What these results are missing is the improvement to sharpness made by the dampening of interior motion of camera parts. From what I have found, the images I am achieving from hand-held shots with the D810 are considerably sharper than the prior D800/E.  Take a look at the high res shot of the Empire State Building later in this blog. 

The color, tones, and noise control of the new EXPEED 4 processing engine are quite noticeable. The images have a different look to them. The colors are richer, gradated tones smoother departing an almost 3-dimensional quality to the image.

Exceptional dynamic range, from the bright window to the deep shadows with no noise and smooth tonal trasition. No fill was added to this severely back lit shot.

The D810 is considered an interim model, and appears at first glance to offer only moderate improvements over the D800/D800E cameras. After using the D810 for only a few days, however, I began to realize that the changes, minor as they might appear to be on paper, considerably expand the versatility of use for the camera into other shooting categories.

The prior models of the D800 and D800E were used primarily for landscape, architecture, still life, and some fashion -- in other words, in areas where a fast frame rate and slow buffer are not as important as image quality, and can be easily tolerated. When shooting sports, lifestyle, animals, or other subjects where capture speed takes a back seat the D800/D800e were just not up to the task. I found my D800 ponderously slow when shooting lifestyle where I would often miss an important part of the action because the camera could not keep up with the changing subject.

Increasing the continuous shooting range from 4 to 5 frames per second may not sound like much, but, when coupled with the faster processing time of the new EXPEED 4 processing engine considerably extends the buffer range of the D810.  In fact, with a few adjustments to improve the file size, the camera can shoot continuously at a frame rate of 5fps speed for long bursts and do it again with only minimal wait time. When shooting  lifestyle or sports photography the ability of the camera to keep on shooting while the action is changing is often more important than the actual frame rate. I usually photograph lifestyle with a Nikon D4 set to a lower speed of 6fps and am finding the 5fps on the D810 coupled with the fast buffer clearance to be quite a comfortable pace.

In DX mode and the larger 1.2x crop mode the D810 continuous mode increases to 6fps,  and for the DX mode only it increases to 7fps with the optional Nikon MB-D12 auxiliary battery pack.

I have always appreciated that Nikon maintains a similar control layout on its pro and semi-pro cameras and keeps the physical design changes of new models to a minimum so that once you are familiar with one Nikon camera model you should feel quite at home with any other. Modern digital cameras have enough menu layers and buttons to rival the cockpit of a jet plane. There are only a few body changes on the D810. Aside from a resculpted hand grip, meter selection has been moved from a collar around the AE-L/AF-L button to a button on top of the left camera knob, as it is on the D4s. 


Meter selection mode button has been moved to the to dial as on the D4s, and the BKT button it replaces is now under the pop-up flash just above the flash over/under button.

A new "i" for "information" button has been added to the back and brings up this LCD screen giving an overall picture of the camera settings and a small menu at the bottom for making some quick menu changes. This is what it looks like in with the camera set to viewfinder mode. 
The "i" button also calls up the quick change menu in  live, and movie view modes as well as in viewfinder mode. In playback mode the "i" button calls up its specific retouch menu. 
The AF/M button on the lower front right of the camera is in the same place as before but now has some dimples added making it easier to feel without looking. I have always had difficulty locating this button while shooting so the change is most welcomed.

For reviewing a scene, the D810 has a new enlarged split screen display mode for examining the image in live view, or making very accurate horizon adjustments by comparing the far left to the far right of the frame. The right half remains stationary while the left half can me moved to cover the rest of the scene.

The 1.2x crop mode still offers a 25.1mp image file. Also due to the edge crop the image focus area is extended to cover a larger relative area of the frame. This is perfect for shooting moving subjects as in lifestyle or animal photography when you want to catch the peak of action.  For animal photography this also delivers a slight extension to your focal length by a factor of 1.2x.  Also in this 1.2x crop mode by selecting 12-bit for the RAW files, the camera will shoot continuously at 6fps to a fast CompactFlash card to the maximum frame limit set on the camera.  I shoot much of my lifestyle photography in a controlled lighting environment so switching from 14 bit to 12 bit does not impact on the dynamic range. For landscape photography on a bright day, however, I would want to use the camera in its full 14 bit capture mode.

Much of my work is done in a studio environment where I have total control of the light so I really don't need a 14-bit range. Switching to 12-bit gives me sufficient data, the camera buffer operates faster, and the files are smaller. This is what I mean when I refer to the versatility of the new D810. It is readily converted to serve whatever type of photography you are doing.

In this severely back lit scene with no fill, done at a 1.2x crop, I experimented by shooting it both with 12 and  14 bit camera settings. I processed the two images at the same time and found no difference between the two bit modes. Considering the speed advantage, not to mention smaller file size, of the 12 bit setting, I see no reason not to use it on a suitable subject.
The D810 has a new RAW S mode for smaller uncompressed RAW files . The files are about 25% of the full res size, producing a 25MB as opposed to 103MB final tif or jpg image file with a resolution of 3680x2456 at 9MP, as opposed to 7360x4912 at 36.3MP.

The D810 is a 2% lighter at 980g vs 1000g -- not much to shout about there. The battery life has been improved by 25% with a CIPA claim of 1200 as opposed to 900 for the D800/D800E. I found that I achieve much more than that. I have been shooting over 3000 shots on a shoot day without depleting the battery.

The LCD screen has been improved with 1,229k dots vs 921k on the D800/E, and its color and brightness can now be customized to suit your preferences.

Paying further attention to any possible motion blur with this camera, Nikon added an electronic front-curtain shutter option for the Mup (mirror up) mode. This eliminates any motion blur that could be caused by the shutter motion.

A new Highlight-Weighted metering mode has been added to the other metering modes. It assigns a greater weight to the brightest areas to prevent blown highlights. This will be of great benefit to event photographers photographing under bright spot lights.

The D810 now has the same Group auto focus as on D4s, where 5 focus points can consolidate to share information that keeps the camera focused on the subject instead of the background.  This is coupled with a new auto-focus algorithm that further improves focusing on dark and low contrast subjects for an overall substantial focusing improvement. I have performed some tests of these improvements and found them nothing short of amazing, as the examples below illustrate.

In this scene there is a single, strong tungsten light shining through the background window, and no fill to light the model from the front. The picture I was trying to achieve was the one on the right, but the way it looked to me through the viewfinder was like the image on the left. I have faced this situation many times before and know from experience that none of the cameras I use could focus on the face, let alone the eye, in this situation. I usually have to switch to manual focus. The 5-point auto-focus of the D810 did not skip a beat, and delivered every shot in focus with no hesitation. Plus, with the dynamic range of the camera I had no trouble opening up the shadows without any noise.  

Severely back lit from the window behind the model a pinpoint focus on the model's eye is difficult to achieve.  Using the 5-group focus points borrowed from the D4s, the D810 had no trouble auto-focusing such a small target. In the past I would have had to "bracket the focus" by over-shooting a scene like this trying in an attempt to guarantee that some of the shots would be in focus. With the new Group autofocus of the D810, all of the photos were in focus. For the type of work I do on a regular basis, that alone is worth the price of admission.


Specifications:


The built-in flash on the D810 can be used as a Commander unit to trigger an off-camera speed light. For this photo a single Nikon SB-910 flash was mounted in a small beauty dish reflector and placed on a stand just above the camera lens. A large collapsible mettalic reflector was placed below the model. The flash was set to manual and remote. 

Still life subjects like this is one of the subjects I normally photograph with the D800 series cameras. It is a composite of 15 images, each shot at a different focus point and later combined (stacked) to create one image with a super depth-of-field. Click here to download a high res version of this image

The Empire State Building photographed with the Nikon 70-200mm f/4 lens and ISO of 64.  Click here to download a high res version of this file.   This image is considerably sharper than what I used to capture with the D800 and the same lens. Even with a high shutter speeds, I found that interior vibrations set up in the camera contributed to a blur that degraded hand-held images.


The low base ISO of 64 makes it easier to quickly achieve nice bokeh by using fast aperture lenses very open. This photo was taken with the Nikon 85mm f/1.4 lens set to f/2 to throw the background completely out of focus..

Click here to download a high res version of this file.


The D810 is selling for $3,296.95, the same as the D800E used to be but with improvements that deliver  a much  better bang for the buck. A new D4s sells for almost twice that, but unless you really rely on an extremely high continuous frame rate, the D810 may be all you really need.

Conclusion:

As a result of the improvements made to the new model, the D810 is a much more versatile camera than its predecessors.

To switch or not to switch:  Should you trade up from a D800/800E to the newer D810?  That is going to depend upon what kind of photography you do. I shoot a very wide array of subjects --  landscape, lifestyle, still life, sports, animals -- which is one reason I have several cameras, a specific model for each type of photography I do. For me the decision was easy. I didn't hesitate in upgrading from a D800 to the new D810, and the more I use it, the happier I am I made the decision. I already prefer the D800 to the D4 for shooting 90% of my lifestyle subjects, reserving the D4 for those times when things are really moving fast and I need that super-high 9fps frame rate.

If you liked the D800/800E, you are going to love the D810. If you are a professional photographer, this is currently the best camera out there for almost any type of shooting.

With its design changes -- modest as they might initially appear to be at first glance -- the new D810 model expands its use from specialized shooting situations to a point where it might be the only camera you ever need for shooting anything -- still life, fashion, architecture, sports, wildlife, lifestyle, landscapes, events, wedding photography, whatever. This camera is as good as it gets.


Remember when cameras didn't have menus?

If you are planning on buying a D810, you can help support this site at no extra cost to you by clicking the link and purchasing from one of our affiliate sellers listed below -- and thanks for your support.


The Nikon D810 camera body can be ordered from:  BH-Photo    Amazon

Selasa, 05 Agustus 2014

An evening of profile views of Manhattan with the Fuji X-T1, 18-135mm zoom, and 23mm lens.

I think I was inspired by the 5-stop vibration reduction prowess of the new 18-135mm to venture out shooting without my tripod. I had the Fuji 18-135mm lens and also the 23mm f/1.4 in case I needed a really fast aperture. In one situation where I wanted to try a long, 20 second exposure to blur the river I did balance the camera on a convenient wall. All the rest were taken with these two lenses and no tripod.

The more distant images were all taken from Greenpoint, Brooklyn.


Here I wanted to create an intentional vertical blur of city lights by moving the camera vertically during an exposure of 1.6 seconds.

Jumat, 01 Agustus 2014

Fuji XF 18-135mm F3.5-5.6 R LM OIS WR lens -- a hands-on review

Typically, all-in-one zooms are full of compromises that cut to the core of their quality level. Convenient they are, but at what price?  There has been an enthusiastic anticipation of the Fujinon XF 18-135mm F3.5-5.6 R LM OIS WR zoom because most of us have a trust based on experience and know that if anyone could pull off a decent do-everything lens it would be Fuji. Not that we would expect such a lens design to come up to the optical quality level of the Fuji primes, but perhaps it could approach the level of the top notch Fuji standard zooms, such as the 18-55mm and 55-200mm. With this in mind, I conducted some of my tests by comparing the new lenses performance to that of the other two zooms. I wanted to know whether this lens could be a substitute for both of the others in a compact do-it-all walk-around kit.

The Fuji 18-135mm lens on an X-T1 with the 55-200mm and 18-55mm in the background.
This is Fuji's first weather resistant lens, probably aimed at complementing the weather resistant X-T1 camera.  It covers a shooting range of 27-206mm with a variable aperture. Its slow aperture range of f/3.5-5.6 is counter-balanced by its ground-breaking 5-stop vibration reduction range.

Things can get a bit amazing with a 5 stop vibration reduction. It means that a shutter speed of 1/4 second is equivalent to hand holding the camera at 1/125 second, which, depending upon the focal length and proximity of the subject, is generally good enough to avoid motion blur. This photo was taken hand-held at 1/4 second with focal length of 98mm (148mm equivalent) and very close to the subject -- everything that argues for a blurred image. I shot it several times just to be certain the results were not a fluke. A couple times it blurred a bit, but most of the images remained sharp. Nothing short of astounding given the criteria. 

I didn't look at this lens as a replacement for both the 18-55mm and 55-200mm lenses, but saw it as something else entirely different, namely as a single carry-around lens to fit the light-weight Fuji X-cameras for those times when you just want to have a good camera with you without the necessity of a camera bag. This weekend, for instance, I will be attending a family wedding and will have just the X-T1 and the 18-135mm with me -- a perfect combo for that type of event where I want to participate but also want to take some really good photos.

This is not to say that the lens cannot perform yeoman-like service when needed, but you will have to exercise good camera technique to bring out its best. I found, for instance, that at f/8 the lens hits its optical stride. That is a bit slow, but would be more than all right for landscape photography which requires good depth of field and sharp focus.

The lens has a linear inner auto-focus mechanism to speed up focus and keep it quiet. The was probably necessary with a zoom having such a closed down maximum aperture. I didn't find it up to the performance level of Fuji's best lenses, but it is pretty quick and accurate.


Specifications of the Fuji 18-135mm f/3/5-5.6 lens:


Size comparison of the three Fuji zooms from left to right: 18-135mm, 55-200mm, and 18-55mm. In terms of weight the 18-135mm is slightly lighter (490g vs 580g) than the 55-200mm, but considerably bigger, and bulkier than the small 18-55mm.
Below are some sample images for downloading to check the resolution qualities of this lens as various apertures. In the main, working wide open presents the typical problems of some softening in the corners of the image. As the lens is stopped down this improves and at f/8 it appears to be working at its optimum with good sharpness overall -- particularly good for this lens type.

The main reason I photograph old, detailed buildings in these tests is that they are a good subject to show off the sharpness of a lens.

This photo was taken at the 18mm focal length with focus placed along the lower protruding decoration of the building. It was taken wide open at f/3.5, f/5/6, and f/8 to illustrate the resolution qualities of the lens. You can download a high res version of each aperture setting below. Pay particular attention to the bottom of the photo where the focus was placed and to the bottom corners to see the lenses performance on its edges.

This image of the Flatiron Building was taken at 135mm extension and f/5.6. Click here to download a high res version of this file. 

One plus of this zoom is its ability to get in tight for macro shots. It is not going to deliver too much in the way of selective focus because of its closed down aperture.


A 20 second exposure stopped down to f/18 shows the aperture star effect on the bright lights.


Taken at a 122mm focal length and f/5.6 aperture. Click here to download a high res version of this file.

Conclusion:

The 18-135mm f/3.5-5.6 lens exhibits many of the typical limitations associated with a do-it-all zoom trying to serve too many masters. It is not in the same optical quality league of the other Fuji zooms, but when stopped down to a working range of f/8 its performance improves dramatically to a point where it is "best of breed" for its type.

The lens is a little heavier than I would have liked for an all around lens, and the camera is particularly front heavy when the lens is extended.

If it's bokeh you're after in selective focus, this lens is not going to have it. The slow maximum apertures work against it. Once again, however, Fuji has surprised us with a few tricks up their sleeve to deliver the best performance from a lens type that is typically only suited for amateur or very cdewinaal shooting. The weather-resistance, new auto-focus, incredible vibration reduction range, and fine optical performance helps make this a lens hold its own in the Fuji optical line up.

I picked up one of these lenses to have for those situations where I only want to carry one camera and no other equipment with me.I didn't trade in any of my other lenses for it because I see it as filling its own particular slot in the lens lineup. Judging from the performance I've seen so far in my tests, I expect I will put it to a lot of use.


If you are planning on buying this lens, you can help support this site at no extra cost to you by purchasing from one of our affiliate sellers listed below -- and thanks for your support.


The Fujifilm XF 18-135mm f/3.5-5.6 lens can be ordered from:  BH-Photo  Amazon   

Selasa, 29 Juli 2014

Controlling a Fuji X-T1 with the Fujifilm Camera Remote WIFi APP

We wanted to do a straight down lifestyle photo of a group of friends eating together at a table. This called for the camera to be located directly overhead and centered on the table, which meant there was no way for me to operate it directly or to even look in the viewfinder or LCD. I didn't want to do an elaborate setup because we had many other scenes to do that day and I didn't want to waste any time. I immediately chose the Fuji X-T1 because its light weight made it very easy to suspend over the table with a simple pole cat setup. Additionally, the Fujifilm Camera Remote APP for wireless control of the camera is one of the best I have seen. I have it on my cell phone and on my tablet, and use it for situations just like this..


This is the setup for the shot. The X-T1 with Fuji 10-24mm zoom was centered, leveled, and suspended above the table by clamping it to a polecat setup.


The camera rig consisted of a Super-Clamp with small tripod ball head attached using the built-in Arca-swiss style mount on the Fuji accessory grip

I controlled the X-T1 entirely with the Fujifilm Camera Remote APP on a Samsung Tab4. One of the nice things about the Fuji APP is that it does more than just trigger the camera. It can also control many of the camera settings. In this situation I set the camera to Auto exposure where I chose the aperture and the camera chose the shutter speed. I preset the camera manually to ISO 400, although even this can be controlled from the APP.   I did use the APP to control the over-under exposure control on the camera and set it to over-expose by +3/5 stop. From then on all I had to do was pick the focus point on the back of the tablet by tapping the location with my finger, and then hit the red shutter button.

The finished photo. A Fuji X camera does it again.

Minggu, 27 Juli 2014

Legends -- Remembering the Weston light meter

Remember when a light meter was an analog device you held in your hand and used it to read the light and then transferred the exposure information to your camera? Sometimes we would read reflected light, sometime incident, and sometime both -- just to be sure. Weston light meters were one of the most popular meters with professional photographers. They were primarily set up for taking reflected readings, although later models had a snap-on opaque dome that converted them into incident meters.

As a "reflected" meter they medewinared the light reflected from the subject or from a substituted neutral gray card. I used to medewinare the light from the palm of my hand, maneuvering my hand in the light to simulate the light that was falling on my subject. Basic, but it worked, even at a time when the margin of error was small due to film latitudes that were a tiny fraction of the dynamic range available with digital cameras of today.

A selection of early Weston meters ranging from the first Master of 1939 to the CdS cell 1966 Weston Ranger 9 with Ansel Adams zone scale. 

Edward Faraday Weston (1878–1971) was the son of a renowned chemist, Edward Weston, who started the Weston Electrical Instrument Corp in 1888. It was Edward Faraday Weston, the son, who applied for the patents on the original Weston exposure meter in 1935. Edward, the father, died in 1936 and the Weston company was acquired by Sagamo Electric.

The meters had selenium cells for taking a direct reading of reflected light. Beginning with the Weston Master II in 1946 an accessory called the "Invercone" could be attached over the selenium cell, thereby converting the meter to incident reading. 

Weston was an early light meter pioneer before film speeds were standardized so the company came up with their own film speed scales, and would publish them in pamphlets called "Weston Ratings".

Weston's son Edward Faraday Weston (1878–1971) received several exposure meter patents for meters that were then manufactured by the Weston Electrical Instrument Corporation and widely distributed since the 1930s. He also established the system of the Weston film speed ratings for the medewinarement of film speeds.

Also know as the Model 715, the Weston Master was made from 1939-45. Because there was no film standard such as ASA, Weston introduced its own film speed tables, which it supplied to photographers. The tables rated all the film speeds of currently manufactured film. these speed could be entered on the meter scale to set it to read for that particular film. 

Weston  made several models of its meter with the Leica name on them Shown here is a 1938 model 650 in an Art Deco box. 

In 1945 Weston introduced a sleek new aerodynamic design with the black Weston Master II. 

Working with a Weston Meter:

Weston Masters all have a large cell on the back of the meter to read the light. You hold the meter facing you at eye-level and point it at the subject to be medewinared.

The meter has both high and low light metering levels. On the back of the meter is a plastic door with holes in it. When you flip this panel to cover the cell, you are reading the bright light. To read in low light fold the door down and lock it with a pin. This signals the meter to change its scale from the high to low reading range. 

Set the film speed on the innermost dial. Take a reading with the meter. Note the number where the needle is pointing.  Turn the outer dial to correspond to this number. Now the next two inner scales will give you all the correct combinations of shutter speed to f/stop. Simple. 

The Weston Master III (1956-60) was the first of the Weston meters to have its exposure scale calibrated with the ASA  index system we still know and love today as ISO. If you have one of these still in working order you can continue to use it with today's cameras. To my mind, this and is the most stylish of all the Weston meters with its rounded Machine Age design  brushed metal case. 

The Weston Master IV was made from 1960-63. This model is my personal favorite. It has a locking lever on the right side so you can take the exposure, and lock the needle in place making it easier to read when you then move the meter in front of your face to read it.  

Made from 1964-72, the Weston Master V was the last of the Master series. The U.S. company closed down in 1972, but a similar version of this meter continued to be produced until 1984 by the British subsidiary as the Weston Euro-Master.
By the mid-1960's more and more cameras began to have built-in meters, rendering the hand-held meter became an obsolete accessory. The Weston company consolidated it holdings in 1972 by closing down its U.S. operation, moving everything to its British affiliate company where the company continued on until 1984.

The clip-on Invercone converted the Weston's direct reading selenium cell into an incident meter.

The Weston Ranger 9 was introduced in 1966 as Weston's the first CdS cell meter. It came with two scales. The one shown here has the Ansel Adams Zone system scale printed on it.  This meter had an 18° bullseye window for viewing the area to be medewinared. It was popular with the photographers Ansel Adams and Minor White. The Ranger 9 was powered by one PX14 or two PX13 batteries, which are not impossible to obtain today. The meter now requires either an adapter to use watch batteries of the correct voltage, or a modification so it will work with a different electrical voltage.

This early photo of Ansel Adams shows him with a Weston Master II around his neck. It was a Weston meter Ansel did not have with him when he took his famous "Moonrise, Hernandez" photograph in 1941 by guessing the exposure.
If you would like to read more about the history of Weston meters check out this site dedicated to Weston meters.   Another place to visit,  James Orllinger's meter site, has plenty of good info on Weston as well as other early meters. 

Some time ago I have had many of the meters featured here re- calibrated by Quality Light Metric Co. in Hollywood. I am not sure they are still doing this, but their contact info was:


QUALITY LIGHT METRIC CO.

9095 Hollywood Blvd. #550
Hollywood, CA 90028
929-467-2265